Eddy current thermography feasibility study using COMSOL Multiphysics
Eddy current thermography (ECT) is a non-destructive contact-free method of defect detection in a conductive material combining the electromagnetic induction of eddy currents and thermal imaging. This technique uses an excitation system consisting of an inductor with coil(s) carrying alternating currents close to the conducting test object to induce an eddy current. This induced eddy current heats the sample being tested, and the defect detection is based on the change in the induced eddy current manifested by the temperature gradient in the sample captured by the thermal imaging camera. In this paper we demonstrate the possibility of using eddy current thermography to detect the single or multiple connected defects at different orientations. COMSOL Multiphysics is used as a tool to predict which cracks will be difficult to detect in order to guide our validation testing protocol.
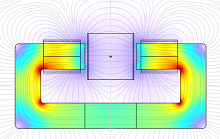
We used the Magnetic Fields physics from the AC/DC Module to model a nonlinear magnetic core with two coils in the frequency domain. The actual waveform to heat the test object is a square pulse with frequency of 20kHz. The EM losses are turned on/off at a frequency of 8Hz. It’s too time consuming to resolve both the thermal and electromagnetic cycles in the model. Instead, we perform a Fourier Transform of the input current waveform and compute the first 10 frequency components and their respective magnitude values. We use these current amplitudes and frequencies to compute the losses from the Magnetic Fields physics and use the sum of these losses as the heat source for the Heat Transfer physics.
We solve the Heat Transfer physics in the time domain for the first 10 cycles so that a temperature gradient develops around cracks in the material. We monitor the temperature on the surface of the test object by discretizing its surface based on the pixel size of the thermal camera and taking the average of the pixels for each discretized surface.
We perform the same simulation for a test object without cracks as a reference model. We then compare the results with respect to the reference model to find the difference/change in the amplitude and the phase of the temperature around the cracks. We simulate the scanning of a flat plate containing half-moon notches, similar to how a validation experiment is set up. We demonstrate these cracks are much more detectable when crack orientation is parallel to the applied magnetic field (i.e. aligned with the induced current flow) than when oriented perpendicularly. We examined the case of a “bridge crack” where the two opposite sides of the crack are connected with a contact point. The bridge crack creates less current distribution than an equally sized half-moon crack. If the bridge is near the plate surface, it will show up as a local hot spot in temperature but not delayed in phase. The gap between the core and the test sample is critical to designing the optimal system for such detection. Hence, either the test sample or cores should be moved/rotated to fully scan the sample for cracks.

